You've probably seen those viral photos of a perfectly square, glistening lattice of pork sitting atop a turkey or tucked into a breakfast sandwich. It looks professional. It looks like something a chef spent an hour fussing over with tweezers. But honestly? Learning how to weave bacon is one of those kitchen skills that's actually way easier than it looks, provided you don't overthink the physics of it. Most people mess this up because they use thin-cut grocery store bacon that disintegrates the moment it hits heat. You need structural integrity.
If you've ever tried to wrap a jalapeño popper or a meatloaf and had the bacon shrink into tiny, sad shriveled curls, you know the frustration. A weave fixes that. By interlocking the strips, the fat renders together, creating a singular, reinforced sheet of meat that holds its shape. It’s basically the plywood of the culinary world, but, you know, delicious.
Why the Bacon Weave is Actually a Structural Necessity
It’s not just about looking cool for Instagram. When you cook loose strips of bacon, they curl because the muscle fibers and fat render at different rates. In a weave, the strips pin each other down. This creates a uniform thickness. If you're building a "Bacon Explosion" (that classic BBQ staple popularized by Jason Day and Aaron Chronister over at BBQ Addicts), the weave is the only thing keeping your sausage filling from leaking out like a culinary disaster.
Think about the BLT. Usually, you take a bite and a whole strip of bacon slides out of the sandwich, slapping you in the chin. It’s annoying. A bacon weave provides "bite-through" consistency. Every single mouthful gets the same ratio of salt, fat, and crunch. No more sliding meat. No more bare bread patches.
Picking Your Materials: Thickness Matters
Don't buy the cheap stuff. Seriously. If you get that paper-thin, "value pack" bacon, it’s going to tear while you’re weaving it. You want thick-cut bacon. Look for brands like Wright or Benton’s if you want that heavy smoke flavor. You need strips that have a decent ratio of lean meat to fat; if it’s all white fat, the weave will just melt into a puddle of grease in the oven.
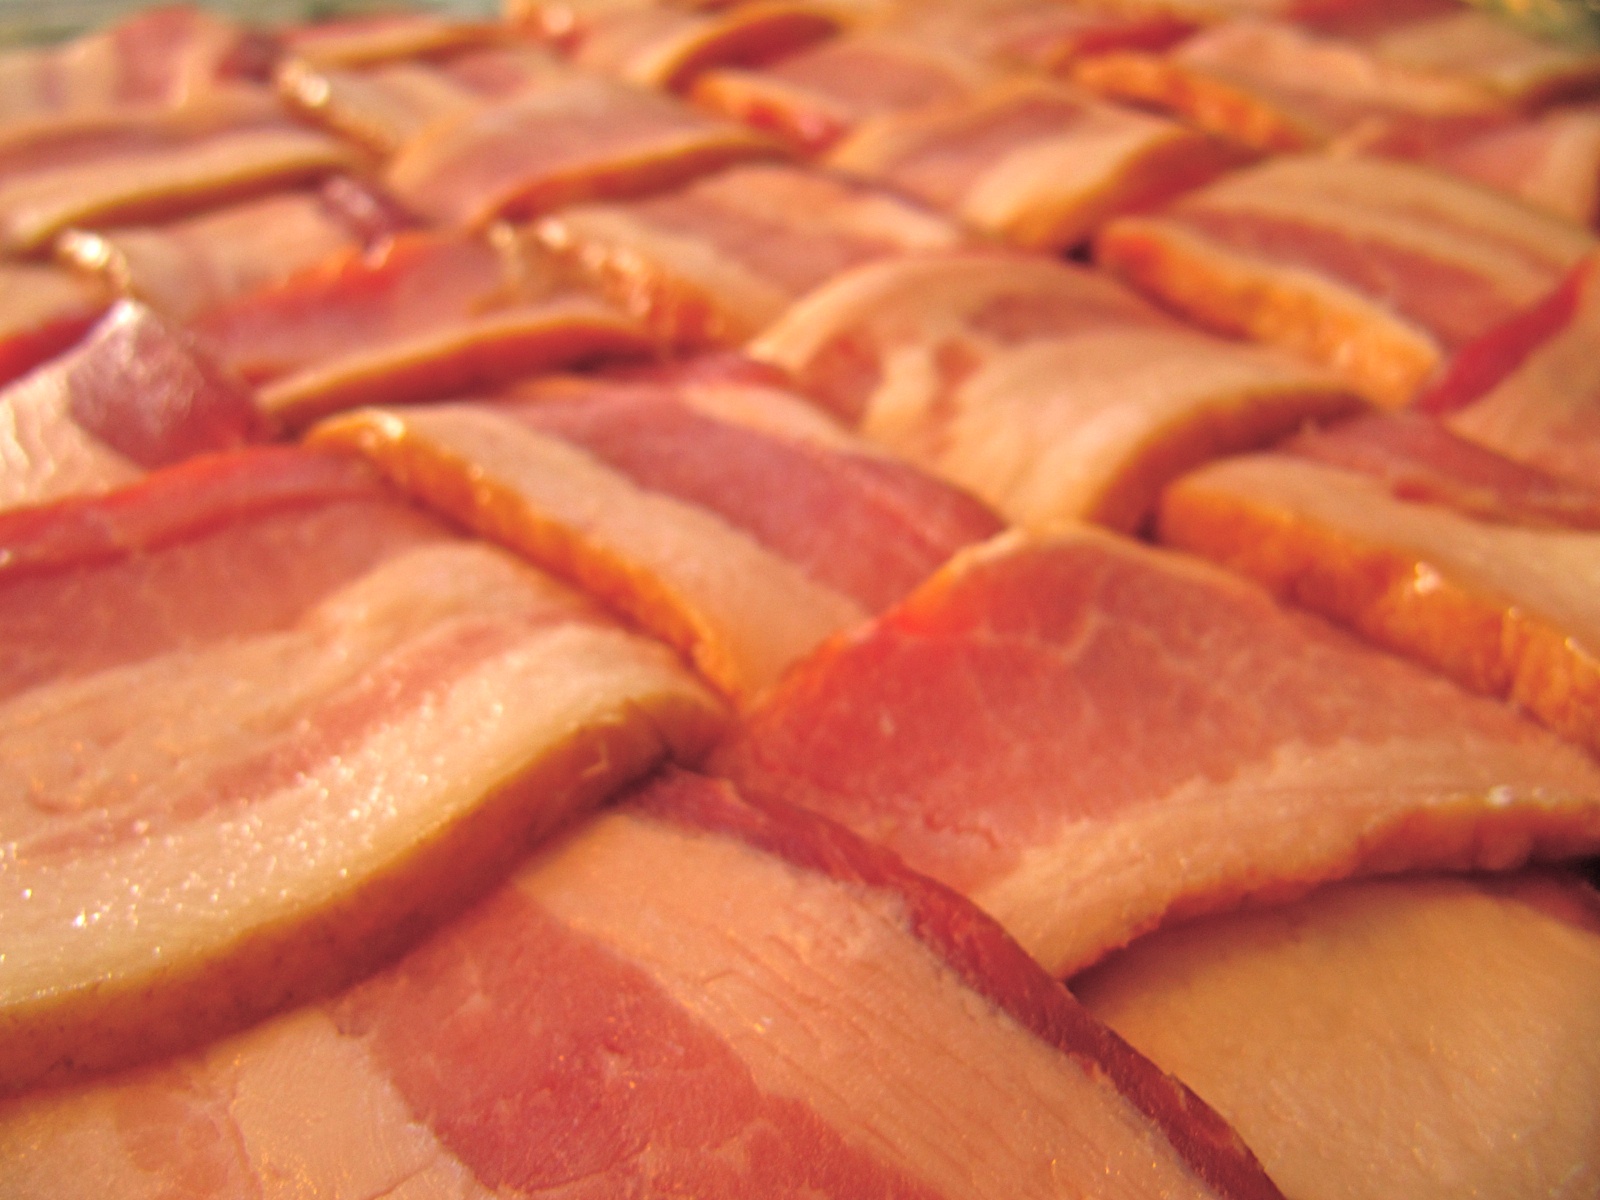
How to Weave Bacon: The Step-by-Step Reality
Let's get into the actual mechanics. You’re going to need a rimmed baking sheet—this is non-negotiable because bacon releases a staggering amount of liquid fat—and some parchment paper. Do not do this directly on the pan or you’ll be scrubbing for three days.
First, lay out five or six strips of bacon vertically on your parchment paper. They should be touching, side-by-side. This is your foundation. Now, fold back every other strip (strip 1, 3, and 5) halfway.
Now, place a new strip of bacon horizontally across the strips that are still lying flat.
Unfold those vertical strips (1, 3, and 5) so they lay back down over the horizontal piece you just added. You’ve now locked in your first row. Next, you do the opposite. Fold back strips 2, 4, and 6. Lay another horizontal strip down. Unfold 2, 4, and 6.
Keep going. Repeat this "over-under" pattern until you’ve reached the ends of your vertical strips. You’ll end up with a square. Or a rectangle. It depends on how long your bacon is. Sometimes the ends look a bit raggedy, but you can just tuck those under or trim them if you’re feeling particularly pedantic about the aesthetics.
The Temperature Trap
Most people crank their oven to 400°F because they’re hungry. Don't. If you go too hot, the edges of the weave will burn and turn into carbon while the center stays gummy and raw. You want a slow render.
Set your oven to 375°F.
Bake it on a wire rack set inside the baking sheet if you want it crispy on both sides. If you bake it flat on the parchment, the bottom will essentially fry in its own juices. Both ways are good, but the rack method gives you that "shatter" texture that makes a bacon weave world-class. It usually takes about 20 to 25 minutes, but you have to watch it. Bacon goes from "perfect" to "burnt offering" in about 90 seconds.
Beyond the Sandwich: Advanced Bacon Weaving
Once you've mastered the basic square, you can start getting weird with it. Some people use the weave as a "crust" for a low-carb pizza. It sounds aggressive, and it is, but it works. You pre-bake the weave until it’s about 70% done, then top it with sauce and cheese and blast it under the broiler.
Then there’s the "Bacon Taco Shell." You drape the raw weave over a couple of thin rolls of tin foil or the rungs of an oven rack so it hangs down in a "U" shape. As it bakes, it hardens into a taco shell shape. Is it healthy? Absolutely not. Is it a feat of engineering? Yes.
Common Mistakes to Avoid
- Overlapping too much: You want the strips touching, but if you pile them on top of each other, the points of contact won't cook. You'll end up with "bacon gum" in the middle of your weave.
- Ignoring the shrinkage: Bacon shrinks by about 25-30% when cooked. If you need a weave to cover an entire meatloaf, make the raw weave significantly larger than the target area.
- Using cold bacon: It’s actually easier to weave when the bacon is cold because it’s less floppy, but if it’s too cold, it might snap if it’s been cured heavily. Room temp is okay, but slightly chilled is the sweet spot for handling.
The Cleanup Strategy
Since we're being honest here, the aftermath of a bacon weave is a disaster zone of grease. If you’re smart, you’ll let that grease cool on the pan until it solidifies, then scrape it into the trash. Never, ever pour it down the drain unless you want to pay a plumber $500 to snake a "fatberg" out of your pipes.
If you're feeling frugal, pour the warm liquid fat through a coffee filter into a glass jar. Keep it in the fridge. Use it to fry eggs or sauté kale later. It’s basically free flavor.
Actionable Next Steps for a Perfect Weave
Ready to try it? Start small. Don't try to wrap a whole 15-pound turkey on your first go.
- Buy one pack of thick-cut bacon (avoid maple-flavored for your first try, as the sugar makes it burn faster).
- Clear a large workspace. You need room to flip strips around without hitting your toaster.
- Practice the "Over-Under" rhythm once with the raw strips before you commit to the layout.
- Use a timer. Check the oven at the 15-minute mark, then every 3 minutes after that.
- Let it rest. Once you take the weave out, let it sit for 2 minutes. The protein fibers will firm up, making the weave much easier to move without it falling apart.
Mastering the weave is basically the gateway drug to competitive-level BBQ. It takes a breakfast staple and turns it into a component that can support entire meals. Just remember: patience in the fold, and low heat in the gold.